|
About two months ago I embarked on a scientific project of no apparent redeeming value: I began charting my sleep habits. I wanted to discover how much I actually slept, when I slept, and if there were any obvious patterns to be discerned. My sleep habits are abominable; by studying these habits I hoped to reduce the chaos in my waking life.
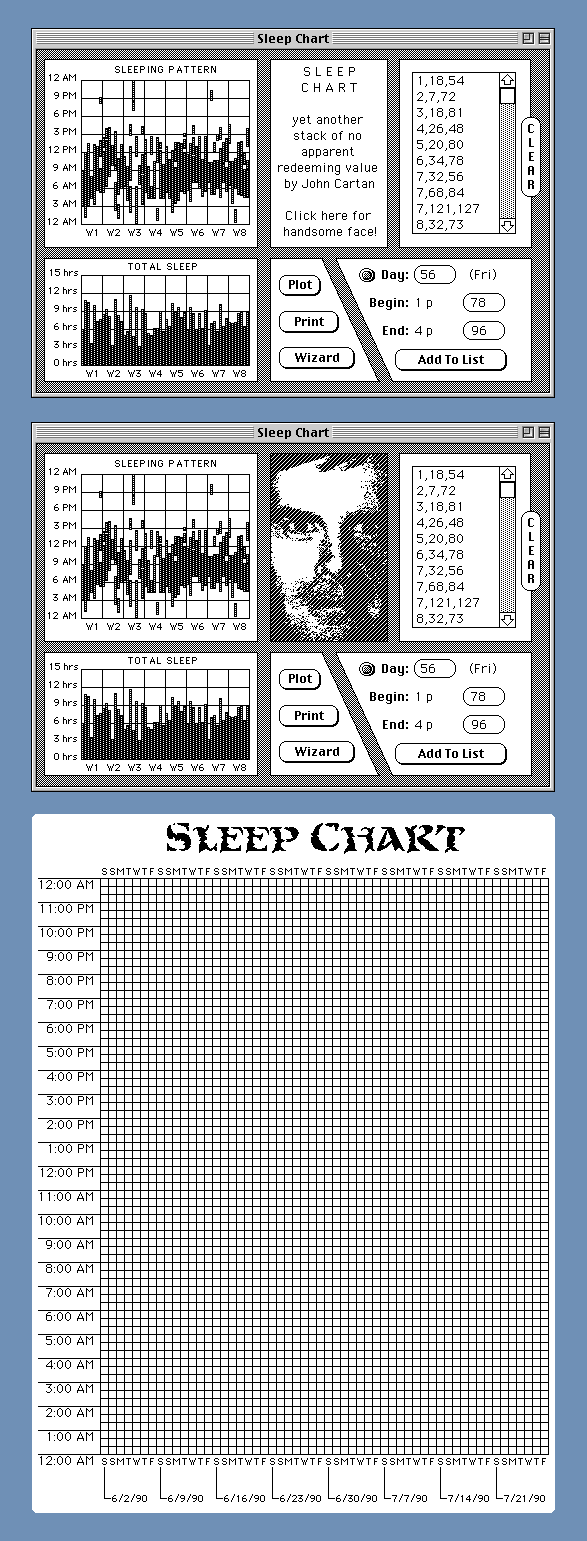
I used SuperPaint to print up a sleep chart. This was simply a piece of graph paper with the hours of the day along the y axis and eight weeks worth of days on the x axis. I kept the chart by my bed along with a red marking pen. Upon waking each morning (or afternoon), I would color in the squares which corresponded to my sleeping time. It was hard to be precise, but I tried to chart my sleeping time to within ten minutes.
After eight weeks I had a chart that looked like a cross between the seismograph of a major earthquake and the EEG tracing of a grand mal seizure. The paper chart was intriguing, but I wanted to enter the data into my trusty Mac so that I could display it several different ways and also produce a chart small enough to fit on a voice card. With this as my motivation I was able to whip up this month's installment of Mr. Wizard in a single evening at Canyon Creek.
WHAT IT DOES
The Sleep Chart program accomplished three goals. First, it allowed me to enter the data from my chart in numerical form, using a kind of shorthand notation to speed the entering. Second, it plotted the data in two formats, a smaller version of the original sleep chart, and a second chart which displays the actual number of hours slept for each day. The third goal was an afterthought: I provided a PRINT button that prints a full page blank sleep chart, with the appropriate dates along the bottom, in case I (or you) ever want to try this again.
Entering the data was a tiresome task. There would often be several different stretches of sleep on the same day, and for each stretch I would have to record the day, the starting time, and the ending time. Rather than type a full date for each day I just used a single number: day 1, day 2, etc. And for the start and end times I used a shorthand notation. "9.4"stood for 9:40 AM. "2.1 p" stood for 2:10 PM.
To simplify the plotting, I converted both times to a number of ten minute periods. 12:30 AM would be recorded as a 3 since it fell on the third "period" of the day. There are 144 such periods in a 24 hour day. Thus three numbers were stored for each stretch: the day number, the starting period number, and the ending period number.
The data entry part of the screen contains a field for each of these three numbers. As soon as I enter a day number, the day of the week is displayed next to it (I can check this against the chart so that I don't get off a day). As soon as I enter a start or end time, the time is automatically converted into periods. And when all three numbers have been entered correctly, the ADD TO LIST button adds the three numbers to the end of a scrolling field.
I added several other features to ease the data entry burden. An "increment" button next to the DAY field increments the day counter (which is faster than re-typing it). If you hold down the option key it decrements instead. I fixed the ADD TO LIST button so that it automatically increments the day counter unless you hold down the option key. And I provided a CLEAR button which clears either the last line of the data list or the entire list.
Plotting and printing were easy to do. The PLOT button first clears the screen and then plots whatever data is listed in the scrolling sleep list. It also charts the total hours slept for each day. The PRINT button asks for the starting date of the eight week period and then prints a blank chart. Because the charting period starts on a Saturday by convention, the date is automatically advanced to the following Saturday if necessary.
NOTE: HyperCard's printing capabilities are rather feeble. To print out a full page I was forced to print screen dumps of two different cards. After you push the PRINT button and enter the date, HyperCard's print dialog box appears. BE SURE TO CHECK THE BOX LABELED "No Space Between Cards." The other buttons should be set for FULL SIZE and STANDARD FORMAT. Then turn on your printer and press OK.
With this nifty little program you can print out your own sleep chart, enter the data, and plot it at the touch of a button. Even if you don't care about your sleep habits (or mine), the program provides a simple example of data entry and plotting. As an added bonus you can catch a glimpse of the author's handsome face by clicking on the title box.
HOW IT WORKS
Junior HyperTalk programmers in the audience may enjoy prowling through some of the button scripts on this card. Following are a few brief notes:
The PLOT button is quite simple. Its first task is to clear the screen of any previous plots using a user defined command (which is defined inside the button script). To simplify this task, I placed all the design elements of the main screen in the card's background. Only the bars on the two charts are drawn in the card layer. Thus to clear away old plots all I have to do is choose any graphics tool, SELECT ALL, and CLEAR PICTURE. The old plot is removed, leaving the rest of the screen in tact.
In order to form the gray bars on the chart, the PLOT script manipulates the paint tools. It first sets the pattern to gray and the mode to filled and then draws a series of gray rectangles. The x coordinate is given by the first number of each line of the sleep list; the other two numbers provide the starting and ending y coordinates. When the day numbers change, the total hours of all stretches in the previous day are added and plotted on the lower graph. The entire script is short and simple.
You may also wish to examine the three data entry field scripts. Whenever you change the number in the DAY field, a four line closeField script calculates the day of the week, with Saturday being day 1, Sunday day 2, etc. These four lines are:
- put card field "Day" into x
- put ((x-1) mod 7)*3+1 into x
- put char x to (x+2) of "SatSunMonTueWedThuFri" into weekday
- put "("&weekday&")" into card field "WeekDay"
A similar method is used for a nifty user defined function which appears in the PRINT button script. The nextSat function takes any date, figures out if that date falls on a Saturday, and if not, returns the date of the following Saturday:
function nextSat x
  put x into d
  convert d to abbreviated date
  put char 1 to 3 of d into d
  if d is "Sat" then return x
  put offset(d,"FriThuWedTueMonSun")
    into z
  convert x to seconds
  add ((z+2)/3)*24*3600 to x
  convert x to short date
  return x
end nextSat
If you want to know how I deciphered my special shorthand notation for starting and ending times and calculated the ten minute period number, check out the timeperiod function which appears in the main screen's card script. (It was placed on the card level so that two different field scripts could use it.)
It took less time to create this program than it did to enter the data. For some thoughts on the shape of my sleep pattern and what I learned from this experiment, see my SLEEP CHART card in this issue's voice volume. And now to bed!
|