|
I have been waiting to release this stack since the very beginning of Archipelago. In fact, it's the first stack I ever wrote. And it is the logical sequel to last issue's Starmaze Puzzle.
WHAT IT DOES
This stack is not really intended for a wider audience, nor is it finished in any real sense; I am always fiddling with and changing it. The starmap stack is a research tool for exploring the starmaze.
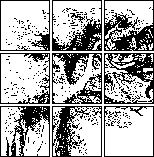
As you've heard before, the 512 rooms and 2304 passageways of the Starmaze can be drawn as one-way paths along the edges of a nine dimensional hypertesserect. Once I came to understand this simple fact, I was well on my way to finding what I called "The Holy Grail," an actual map of the maze. After seven years of searching, culminating in three intensive months locked in my cabin here in Canyon Creek, I finally found a way to represent this complexity in an ordered two-dimensional form. I first drew the map as a 3 by 4 foot poster, and then I set about creating a HyperCard version of the map. This stack grew from that original project.
The map consists of 16 diamond shaped microcosms, each containing 16 small rooms. Each of these rooms actually represent two different starmaze patterns; both a pattern and it's inverse occupy the same location on the map. Thus the coordinate system consists of a capital letter (A-P) to designate the microcosm, a lowercase letter (a-p) to designate the room within that microcosm, and a + or - to distinguish between a "positive or negative" form of the pattern.
Notice that the overall pattern of pipes which link the microcosms is repeated in miniature with the tubes linking the rooms inside each microcosm (except that the inner pattern is rotated 135 degrees with respect to the outer pattern - why? I don't know). The pipes and tubes are colored black or white in the HyperCard version and these colors are critical. The arrangement of pipes remains constant in each microcosm, only the pattern of colors changes.
The reason that the color matters is that this is a color maze. That is, the passageways you are permitted to take out of each room depend on the color of those passageways and on the color of the passageway you used to enter the room. Thus if you entered the room through a black passage, you must leave through a white, and vice versa. This color scheme is what enabled me to combine a pattern and it's inverse into the same room (thus halving the number of rooms to be drawn). It also liberates me from the need to draw arrows on all the passageways. Each passageway is one-way, but the direction of the passage depends on where you've been.
There is one last trick to understanding the map. In order to reduce the number of passages drawn into each room I have combined half of the tubes into the set of intercosm pipes. Thus, from each room you can leave not just from the four tubes shown on the map, but also (depending on the color) you can move north, south, east, or west by drawing a straight line from the appropriate corner of the room to the nearest pipe, following that pipe to whatever microcosm it leads to, and then jumping to the equivalent room within THAT microcosm.
You can perform a similar trick by diving into the small circle in the center of each room (if it's the right color) and moving through the big "center pipes" to the equivalent room in the micrososm at the other end of the pipe. Once you understand how to read the map, you can move through the maze in a completely graphical manner, without understanding how the map relates to the starmaze puzzle.
The map DOES relate to the puzzle, however, in a very precise way. Whenever you select one of the four "crosstip" cells in a pattern, it's the same as moving through a specific tube inside a specific microcosm. Similarly, choosing a corner cell is like choosing a pipe from one microcosm to an adjacent one, and choosing the center cell is like travelling through the big center pipe to "the other side of the maze."
Thus every movement in the puzzle version can be plotted on the map. The trace list feature allows me to keep a record of a specific path taken through the maze, and then plot that path on the map. I can zoom in for a closer view of any part of the map, and I can also ask the computer to calculate the shortest path between any two rooms.
The main control panel next to the map is very complex and very subtle. Notice the tiny arrows in the main star pattern display. This shows compass distortions at any point in the maze so that I can deduce EXACTLY what pipe or tube corresponds to a given movement. Another display shows the Cartesian coordinates for each location in the maze, which allows me to pinpoint which corner of the nine dimensional hypertesseract I am at.
A more whimsical display in the lower right corner of the control panel shows whether a given pattern is a sun or moon pattern, what season it is, and what hexagram it corresponds to. No, I have not solved the I Ching problem discussed two issues ago; this scheme is an earlier, more primitive correlation that will have to do until I can find something better.
There is a whole world beneath the "Auxiliary" button. For years now I have been doing experiments and gathering data about the starmaze. In each case I create a specialized new button which can be made to automatically replace the auxiliary button. Each button is mounted on a card with notes about the experiment. In this way I can use the same control panel for dozens of wildly different experiments. I can also store data which can be sent into the trace list and plotted on the map. Push the Auxiliary button to read through these experiment cards if you like.
The Help button describes some even MORE obscure features of the control panel, features so obscure that I would probably forget them myself if I didn't have them written down. Feel free to browse through this stack and push buttons at random. I realize that this creation is not particularly entertaining to anyone other than myself, but I wanted you all to have at least a glimpse into my inner sanctum, into the heart of the strangest of all my ponarvs.
HOW IT WORKS
I'm not going to spend much time discussing the inner workings of this stack, except to point out the power of custom-designed icons. The most spectacular display of this arcane artform can be seen by pushing the path button. Here you will find 144 tiny, individually crafted icon buttons which form the intricate shapes of the 16 starmaze patterns which can be displayed simultaneously. Each cell of each pattern can be turned on or off and can be made to display either no compass arrow or an arrow in one of two positions.
Those of you who have ever tried dragging buttons into place on a card may wonder how I ever found the patience to place 144 tiny buttons in precisely the correct locations. The answer is that, as is often the case, I wrote a quick program to HELP me with the placement. One of the wonderful things about HyperCard is that you can easily write simple programs to HELP you write more complicated programs. Even with this help, I must admit, it was a royal pain!
This concludes my two part series about the starmaze. If any of you want answers to the problems posed in the last Mr. Wizard column, you can use this starmap program to find most of them, or, as usual, you can just ASK. Mr. Wizard is always glad to answer questions, especially about his pet projects.
|