

For exploring the oceans, Cousteau had his ship Calypso. For exploring the heavens, Hale had his observatory Palomar. For exploring the higher dimensional spaces of the starmaze, I have had a strange and wonderful HyperCard program called the Starmaze Explorer. I created this tool the very year HyperCard was invented, in 1987, and it's been in continual use since. I hope you will forgive me a certain pride of ownership as I describe its inner workings.
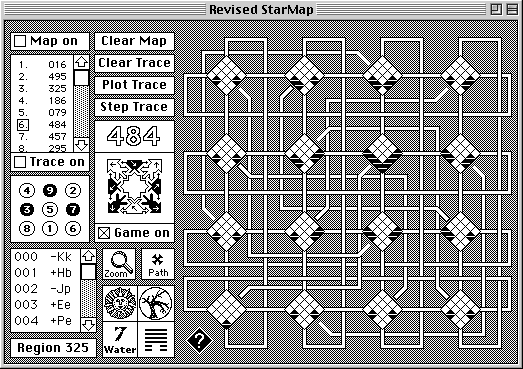
The main function of the Explorer is to plot sets of patterns against the starmap. The right half of the screen contains a highly simplified representation of the map with its sixteen microcosms. Each microcosm contains sixteen diamond-shaped room locations; each diamond consists of an upward pointing triangle for a sun room and a downward pointing triangle for a moon room. The screenshot above shows the revised map, completed in 1998. (For more information on the revised map, see the Revised Atlas.) In addition to displaying plots of pattern locations, the map is also an input device; clicking on any triangle in the map will cause the corresponding pattern to be displayed.
The controls on the left half of the screen include the trace list, the binary coordinate display, the atlas lookup, the main pattern display, and various additional buttons and indicators. The trace list holds a list of one or more starmaze patterns. These patterns can be generated by pushing the interchangeable auxiliary subroutine button in the lower left corner of the screen, copied in from cards in the lab notebook (discussed below), or entered manually through the main pattern display. Clicking on any pattern number in the trace list causes that pattern to be displayed.
 The button next to the trace list control its function. If the Map on checkbox is checked, every new pattern entered
into the main pattern display is automatically plotted on the map. If the Trace on checkbox is checked, every new pattern
entered is automatically added to the trace list. This provides an effortless way to record a journey through the maze.
The Clear Map button removes all the black triangle markers from the map. The Clear Trace button clears the trace
list in preparation for a new journey. The Plot Trace button takes all the patterns contained in the trace list and plots them on the map all at once. The Step Trace button steps through each pattern in the trace list one at a time; each time you
push this button, a box is drawn around the next item in the list and the corresponding pattern is displayed in both the
main pattern and binary coordinate displays.
The button next to the trace list control its function. If the Map on checkbox is checked, every new pattern entered
into the main pattern display is automatically plotted on the map. If the Trace on checkbox is checked, every new pattern
entered is automatically added to the trace list. This provides an effortless way to record a journey through the maze.
The Clear Map button removes all the black triangle markers from the map. The Clear Trace button clears the trace
list in preparation for a new journey. The Plot Trace button takes all the patterns contained in the trace list and plots them on the map all at once. The Step Trace button steps through each pattern in the trace list one at a time; each time you
push this button, a box is drawn around the next item in the list and the corresponding pattern is displayed in both the
main pattern and binary coordinate displays.
 The main pattern display consists of a display field and nine-cell pattern display. The display field displays the current
pattern number and also allows you to enter new pattern numbers; as soon as you hit the enter key, the nine-cell display
and all the other indicators on the page are automatically updated. Similarly, the nine-cell display both presents
a given pattern and allows you to enter new ones. If the Game On checkbox is checked, clicking a dark (open) cell
will change the pattern just as it does in the puzzle; click a white (closed) cell is not allowed unless you hold down
the option key (which essentially moves backward). If this checkbox is not checked, clicking a cell, black or white, merely
flips that one cell without affecting its neighbors. This is very useful for quickly entering a new pattern.
The main pattern display consists of a display field and nine-cell pattern display. The display field displays the current
pattern number and also allows you to enter new pattern numbers; as soon as you hit the enter key, the nine-cell display
and all the other indicators on the page are automatically updated. Similarly, the nine-cell display both presents
a given pattern and allows you to enter new ones. If the Game On checkbox is checked, clicking a dark (open) cell
will change the pattern just as it does in the puzzle; click a white (closed) cell is not allowed unless you hold down
the option key (which essentially moves backward). If this checkbox is not checked, clicking a cell, black or white, merely
flips that one cell without affecting its neighbors. This is very useful for quickly entering a new pattern.
Inside each cell of the display are tiny arrows. These indicate the orientation of the actual pipe corresponding to that cell on the map. Because the orientation changes from room to room, these arrows will shift from one pattern to the next.
 The binary coordinate display always stays in synch with the main pattern display. And, like the main pattern display,
it both displays the current binary coordinates and allows you to change them.
The numbers displayed are the Lo Shu cell numbers; a white circle indicates a value of 0,
a black circle a value of 1. In the current pattern notation, this would
correspond to circles for the 0s and squares for the 1s. The binary coordinate display also respects current setting
of the Game on checkbox. Having both displays side by side nicely conveys the relationship between puzzle patterns
and their underlying binary coordinates.
The binary coordinate display always stays in synch with the main pattern display. And, like the main pattern display,
it both displays the current binary coordinates and allows you to change them.
The numbers displayed are the Lo Shu cell numbers; a white circle indicates a value of 0,
a black circle a value of 1. In the current pattern notation, this would
correspond to circles for the 0s and squares for the 1s. The binary coordinate display also respects current setting
of the Game on checkbox. Having both displays side by side nicely conveys the relationship between puzzle patterns
and their underlying binary coordinates.
 The atlas lookup is located beneath the binary coordinate display. It lists the map location of all 512 patterns
using standard map notation: a plus for sun rooms or minus for moon rooms followed by uppercase A to P for microcosm
and lowercase a to p for room position. Clicking any item in the lookup causes it to be displayed. Also, if you
enter a search string in standard map notation using the find command, Starmap Explorer will automatically notice
this and scroll to and highlight the item in the atlas lookup.
The atlas lookup is located beneath the binary coordinate display. It lists the map location of all 512 patterns
using standard map notation: a plus for sun rooms or minus for moon rooms followed by uppercase A to P for microcosm
and lowercase a to p for room position. Clicking any item in the lookup causes it to be displayed. Also, if you
enter a search string in standard map notation using the find command, Starmap Explorer will automatically notice
this and scroll to and highlight the item in the atlas lookup.
 A console of four additional buttons is located to the right of the atlas lookup. The upper left button
displays a sun for sun rooms or a moon for moon rooms; pushing it causes the current pattern to invert.
The upper right button displays the season of the currently displayed pattern:
Spring, Summer, Winter, or Fall. Similarly, the lower left button displays the current pattern's
element: fire, water, wood, earth, or metal.
The lower right button is now out of date. It displays an I Ching hexagram formerly associated with each room.
This scheme was later replaced by a system of hexagrams associated with each passage in the maze
(see Hexagram Concordance).
A console of four additional buttons is located to the right of the atlas lookup. The upper left button
displays a sun for sun rooms or a moon for moon rooms; pushing it causes the current pattern to invert.
The upper right button displays the season of the currently displayed pattern:
Spring, Summer, Winter, or Fall. Similarly, the lower left button displays the current pattern's
element: fire, water, wood, earth, or metal.
The lower right button is now out of date. It displays an I Ching hexagram formerly associated with each room.
This scheme was later replaced by a system of hexagrams associated with each passage in the maze
(see Hexagram Concordance).
Clicking the question mark button in the lower left corner of the map causes the following help screen to be displayed:
Each of the three remaining buttons on the main screen lead to deeper features of the Starmaze Explorer.
![]() The first of these is the Zoom button located just below the main pattern display.
Whenever you hover the mouse over this button, the room triangle associated with the currently displayed pattern
begins to blink on the map. This is subtle, but eye-catching and instantly reveals the location of any pattern
even when the map is displaying many other pattern locations. Clicking the button zooms in on the current
location and opens up a navigation feature:
The first of these is the Zoom button located just below the main pattern display.
Whenever you hover the mouse over this button, the room triangle associated with the currently displayed pattern
begins to blink on the map. This is subtle, but eye-catching and instantly reveals the location of any pattern
even when the map is displaying many other pattern locations. Clicking the button zooms in on the current
location and opens up a navigation feature:
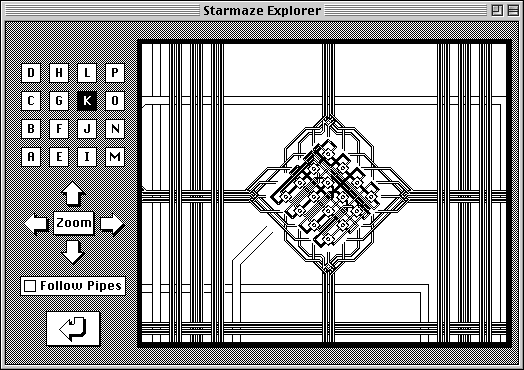
This first screen is the intermediate zoom. It provides some context of the area immediately surrounding the current microcosm, here microcosm K. You can use the sixteen letter buttons to immediately jump to any other microcosm in intermediate zoom or use the four directional arrow buttons to follow macropipes north, south, east, or west. Checking the Follow Pipes checkbox causes these directional buttons to respect the actual meanderings of the macropipes instead of simply moving one unit on the grid. This was important on the original map but is no longer needed on the revised map. Clicking the Zoom button on this page causes a jump to full magnification:
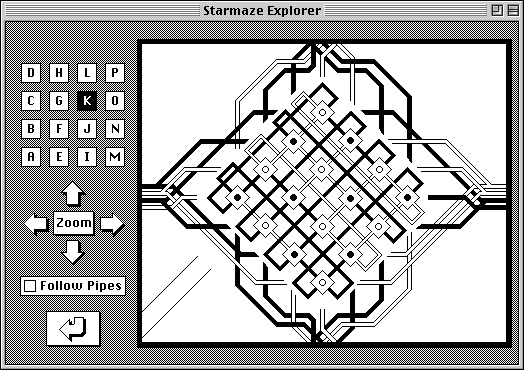
At this level it becomes easy to see the coloring of the individual micropipes and trace movements from room to room. The navigation buttons work the same here as they do on the intermediate level, but allow movement directly to other fully-magnified microcosms. This full level of magnification is recreated in the Atlas and Revised Atlas pages. Pressing the bent arrow button returns to the main display.
![]() The next button of interest is the Path button, located next to the Zoom button.
Clicking this button carries us to the Pathfinder Page, one of the most useful features of
the Starmaze Explorer:
The next button of interest is the Path button, located next to the Zoom button.
Clicking this button carries us to the Pathfinder Page, one of the most useful features of
the Starmaze Explorer:
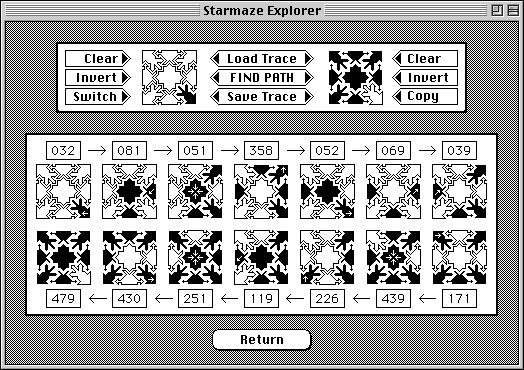
The pathfinder provides two functions: calculating a shortest path between any two patterns, and displaying a subset of up to fourteen patterns from a path in the trace list. Shown here is one of the longest shortest paths in the maze, the path from pattern 32, which has only the southeast yin cell open, to its inverse, pattern 479. The first seven steps are displayed from left to right and the final seven below it from right to left. Tiny orientation arrows are displayed within the particular cells that initiate the transformation at each step.
Entering starting and ending patterns is easy using the console at the top of the screen. Both the start and end pattern displays are also input devices; click any cell on either one to flip from open to closed. The Clear and Invert buttons on either end of the console clear the start of end patterns (set all their cells to white/closed) or invert whatever pattern is currently entered. The Switch button on the left switches the two patterns. The Copy button on the right copies the start pattern to the end pattern. Using these buttons it is usually possible to enter both start and end patterns with only a few clicks. You can then click the FIND PATH button in the center of the console to immediately calcuate the shortest path between these two patterns.
The Load Trace in the top center of the console loads the patterns from the trace list for immediate display. If there are more than fourteen patterns in the list, the program prompts the user to choose either the first fourteen or last fourteen. This is very useful for examining and comparing multiple patterns from a trace list at once. (Patterns taken from the trace list are displayed without orientation arrows.) The Save Trace button reverses the process, saving the currently displayed path back to the trace list. This allows a researcher to calculate a shortest path, then return to main display in order to plot the path on the map. The Return button returns to the main display.
The final button on the main display is the auxiliary subroutine button, located in the lower left corner. Unlike the rest of the controls on the main display, this button is interchangeable. An auxiliary button is created to perform a specific experiment; when that experiment is complete, the button can be swapped out and replaced with any other similar button.
Auxiliary buttons are stored in an extensible section of the Starmaze Explorer called the lab notebook. Each page of the notebook contains a button, a trace list, and explanatory notes. The Spring button is a typical example:
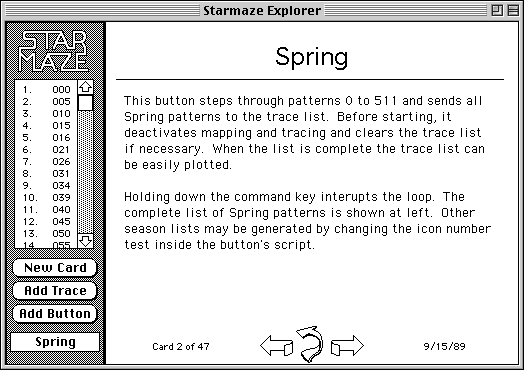
The Spring button itself is located in the lower left corner of a notebook page and contains a HyperCard subroutine that, when run, produces a list of patterns. As with all HyperCard buttons, you can option click it to examine the script. The trace list on the top left contains the values generated by this button. The Add Trace button returns to the main display and replaces the previous contents of the main trace list with the contents from this card. Those patterns can then be plotted on the map or further examined with the Step Trace or Path buttons.
Similarly, the Add Button button returns to the main display and swaps out the previous auxiliary button with whatever button is on this notebook page. The researcher can then push the button and watch it run. Most buttons produce a list of patterns which are recorded in the main trace list. Others perform some commonly needed function, like the Reduce button, which eliminates duplications from a trace list. Another example is the Wander button which simply moves at random through the maze. The researcher can choose whether or not to turn the map or the trace on before pushing this button, or can modify the script to perform a new experiment.
Option-clicking either the Add Trace or Add Button buttons reverses the process, pulling a trace list or button from the main display. This is useful when creating new notebook cards. Actually creating a new card is done by clicking the New Card button, which asks for a title and then automatically creates a new card with button, card title, and date stamp already present.
Over the years I have created many new notebook cards. My experiments are preserved and can be returned to and re-created at any time. Because of this extensibility, the Starmaze Explorer is a living, growing tool which becomes larger and more useful with each new addition. It has served me well for decades and I trust it will continue to aid my explorations for decades to come.
![]()
![]()
![]()
![]()