
The starmaze puzzle consists of patterns of nine cells, and forms a structure that neatly fills a nine-dimensional binary space. But as part of my effort to distill the essence of this puzzle, and understand what constitues "starmazedness", I've spent some time over the years defining and investigating other forms of the puzzle. A general n-dimensional definition of a starmaze puts the classic puzzle in perspective and provides rich insights into its various properties. Smaller forms of the puzzle are also much easier to handle. This page catalogs some of those insights - and some of the curious artifacts generated along the way.
The key insight into reaching for a general definition is that the three-by-three square shape of the classic puzzle is misleading. The n-dimensional starmaze is better understood as a circle with alternating yin and yang cells arranged around a single center. A 25-dimensional starmaze, for example, would look something like this:
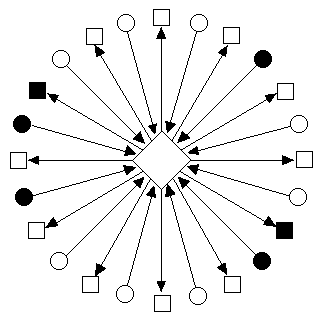
Here, yang cells are represented as squares, yin cells as circles, and the center call as a diamond. There are a total of 25 cells: 12 yang cells, 12 yin cells, and a center cell. Four yin cells and two yang cells are open; the rest, including the center, are closed.
In an n-dimensional starmaze pattern, there is 1 center cell, (n-1)/2 yang cells, and (n-1)/2 yin cells. A starmaze is considered "proper" if there are an even number of yin cells and an even number of yang cells, that is, if (n-1) is a multiple of 4. So puzzles of dimension 5, 9, 13, 17, 21, 25, etc. are proper starmazes. The rules for an n-dimensional starmaze puzzle are as follows:
- Selecting an open yang cell causes it and its two neighboring yin cells to flip.
- Selecting an open yin cell causes it, its two neighboring yang cells, and the center to flip.
- Selecting the center cell causes it and all yang cells to flip.
There are 225 or 33,554,432 possible patterns in a 25-dimensional starmaze. You would think that such a vast number would preclude the possibility of ever solving this form of the puzzle. But with a little thought, I was able to derive a generalized solution that works for starmaze puzzles of any dimension. The solution consists of seven phases, with each phase requiring one or more steps depending on the size of the puzzle. The following table shows the seven phases and the number of steps required for each phase:
| Phase | # of Steps | Action |
|---|---|---|
| 1. | 1 | Flip center cell off. (All yang cells turn on.) |
| 2. | (n-1)/4 | Turn off every other yang cell. (All yin cells turn on.) |
| 3. | (n-3)/2 | Turn off every yin cell but one. (Center will flip an odd number of times and end up turned on. The yang cells will flip on and off, but the number of open yang cells will remain constant.) |
| 4. | 1 | Flip center cell off. |
| 5. | 1 | Turn off the final yin cell. (Center will flip on. Now all yin cells are off and every other yang cell is on.) |
| 6. | (n-1)/4 | Turn off all remaining yang cells. (All yin cells will end up turned on.) |
| 7. | 1 | Flip center cell off. (All yang cells turn on. You have reached the ending pattern.) |
For the 25-dimensional starmaze, the total number of steps required is
In July of 1986 I verified this by solving an actual 25-dimensional puzzle. I used a quarter for the center cell and dimes and nickels for the yin and yang cells. Heads meant on, tails meant off. It worked.
In general, the total number of steps required is n+2. As you can see, the solution path for the classic puzzle (11 steps + ending pattern) follows this algorithm:
| Step 1: | Flip center. |
| Steps 2 to 3: | Flip every other yang. |
| Steps 4 to 6: | Flip all but one yin. |
| Step 7: | Flip center. |
| Step 8: | Flip final yin. |
| Steps 9 to 10: | Flip all remaining yangs. |
| Step 11: | Flip center. |
It should be noted that the algorithm allows some variation in the precise sequence of cells selected.
There are many different ways, for example, to "flip every other yang" (four different ways for the 9D case).
Also, there is some flexibility in the required order of these steps. For example, you can do part of
phase two, then part of phase 3, then finish phase 2 before finishing phase 3.
As a result, there are 1920 different 11-step solutions to the 9-D starmaze.
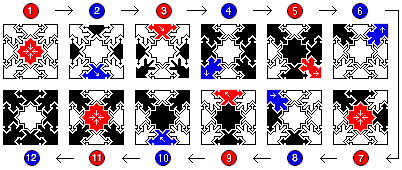
![]()
3D Starmaze
Once we have a generalized concept of the starmaze, it becomes possible to consider specific examples other than the classic 9-dimensional definition. The 3-dimensional starmaze is not "proper" because it does not have an even number of yin and yang cells, but it is the only one that can be fully visualized in the normal three dimensional space we live in - so it is worthy of study.As before, we use a circle to represent a yin cell, a square for the yang cell, and a diamond for the center. There are a total of 23 = 8 different patterns. These eight patterns can be associated with the corners of a cube, and all possible legal moves can be associated with the cube's 12 (directed) edges as shown in the following diagram:
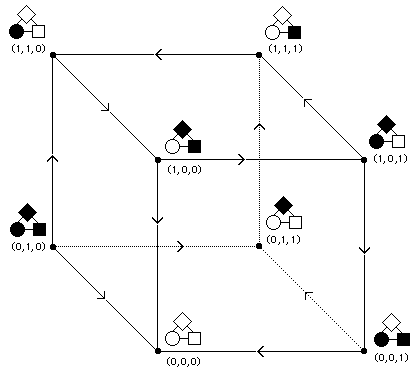
Each corner is given a three-digit coordinate in 3D binary space.
- The first digit represents either bottom (0) or top (1) in the vertical or z dimension. Here this is associated with changes in the center (diamond) cell.
- The second digit represents either front (0) or back (1) in the y dimension. Here this is associated with changes in the yin (circle) cell.
- The third digit represents either left (0) or right (1) in the x dimension. Here this is associated with changes in the yang (square) cell.
The rules for an 3-dimensional starmaze puzzle are as follows:
- Selecting an open yang cell causes it and the yin cell to flip.
- Selecting an open yin cell causes it, the yang cell, and the center to flip.
- Selecting the center cell causes it and the yang cell to flip.
In 3 dimensions, the start and finish positions are on adjacent corners, differing by only a single bit in the y dimension. But as the arrow indicated, a direct movement from (0,1,1) to (0,0,1) is not allowed. Instead, the shortest possible path requires, as it does in all forms of the starmaze, a total of n + 2 = 5 steps in this case.
Because there is only one yin and one yang cell, it is not possible to follow all seven phases of the general solution algorithm. Instead, phases 3 to 5 are collapsed to a single step. It is interesting to compare the classic solution with its 3-dimensional counterpart:
| 9-D Starmaze | 3-D Starmaze | |
|---|---|---|
| 1. | Flip center. | 1. Flip center (move up). |
| 2 - 3. | Flip every other yang. | 2. Flip yang (move left). |
| 4 - 6. | Flip all but one yin. | 3. Flip yin (move frontward). |
| 7. | Flip center. | |
| 8. | Flip final yin. | |
| 9 - 10. | Flip all remaining yangs. | 4. Flip yang (move right). |
| 11. | Flip center. | 5. Flip center (move down). |
Incidentally, the cube described here is number 1619 out of 4096 different 3-dimensional hypercube puzzles.
For more information on hypercube puzzles, see Puzzle Keys.
![]()
5D Starmaze
The 5-dimensional starmaze is the smallest and simplest "proper" starmaze: it has an even number of yin cells (2), an even number of yang cells (2) and a center cell. And just as the the 3D starmaze can be drawn along the edges of a 3-cube, the 5D starmaze can be drawn along the 32 corners and 80 edges of a 5-cube, or hyper-tesseract. Unfortunately, a 5-cube is harder to visualize than an ordinary 3-cube.Just as a cube is built by connecting the four corners of a lower square to the 4 corners of an upper square, a tesseract is built by connecting an inner cube to an outer cube. A hyper-tesseract takes this one step further by connecting the 16 corners of an inner tesseract to the 16 corners of an outer tesseract.
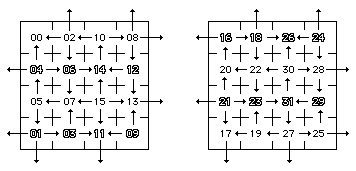
In 1986 I made a chart which described how all 32 corners of the 5-cube connect. I used a slightly different design to represent 5D patterns: a small square for the center cell and circles for both the yin and yang cells (the north and south circles are yin, the east and west are yang). Next to this, the chart shows the coordinates and associated patterns for corners 0-15 (the inner tesseract), and corners 16-31 (the outer tesseract):
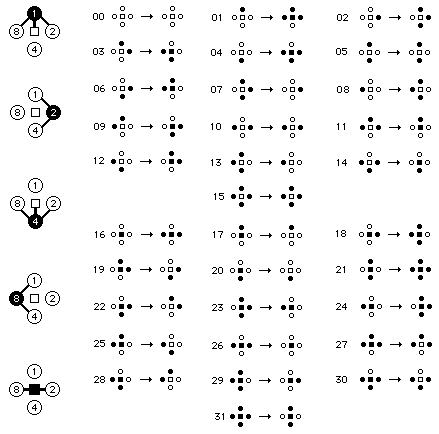
The thickened connector lines on the left side of the chart illustrate the rules of pattern transformation.
- Flipping a yang cell causes the north/south yin cells to flip.
- Flipping a yin cell causes the center and the east/west yang cells to flip.
- Flipping the center causes the east/west yang cells to flip.
For example, corner 11 is extended along the x, y, and w (1st, 2nd, and 4th) dimensions. If we used the right-to-left notation employed above in the 3D starmaze, this would be represented as (0,1,0,1,1). Instead, we start with cell 1 for dimension x and move clockwise, filling every cell corresponding to a binary 1 and summing its value. In this case we would fill in cells 1, 2, and 8 and sum them to derive coordinate 1+2+8 = 11.
![]() If you look at pattern 11 in the chart, you will see that its coordinate pattern (on the left)
differs from the pattern on the right - the pattern that would appear to players of the 5D version of the starmaze puzzle.
As with the 3D starmaze, black in a puzzle pattern cell indicates that movement is allowed
along the dimension associated with that cell.
If you look at pattern 11 in the chart, you will see that its coordinate pattern (on the left)
differs from the pattern on the right - the pattern that would appear to players of the 5D version of the starmaze puzzle.
As with the 3D starmaze, black in a puzzle pattern cell indicates that movement is allowed
along the dimension associated with that cell.
Here we see that only the center and north yin cells are filled in for the puzzle pattern. A player reaching this pattern would have only two choices: flip the center (dimension 5) or the north yin (dimension 1). On the 5-cube this means that directed arrows are leaving corner 11 along the edges extending in dimensions 1 and 5 (and coming into corner 11 along edges in dimensions 2, 3, and 4.)
Suppose the player did decide to flip the center cell. This would cause both of the yang cells to flip as well, resulting in a puzzle pattern with the north yin and both east and west yang cells filled in. When calculating coordinate numbers, the center cell has a value of 16, so in this case flipping the center cell adds 16 to our value, 11+16 = 27, moving us from the inner tesseract (the top half of the chart) to the outer tesseract (the bottom half of the chart). As you can see, pattern 27 has a coordinate pattern that differs only by the center cell and a puzzle pattern with only the north, east, and west cells filled in.
If the player at pattern 11 choose to flip the north yin cell instead, this would cause the center to flip off and both east and west yangs to flip on, resulting in pattern 10. Again, the coordinate pattern differs by a single bit (the north bit, with value 1, going from 1 to 0, so we subtract 1 and get 11 - 1 = 10) while the associated puzzle pattern goes from having only the center and north cells filled in to having only the east and west cells filled in.
By following every possible transformation, we can construct floorplans for both the inner (0-15) and outer (16-31) tesseracts. Horizontal arrows correspond to movements through yang cells. Vertical arrows correspond to movements through yin cells. Cell numbers with the center cell open in the puzzle pattern are shown in outline. If you are in an outlined room, you are allowed to hop to the corresponding room in the other floorplan:
Each floorplan is a torus. That is, arrows extending leftward from the left edge of the floorplan wrap around and lead to rooms in the same row on the right edge of the floorplan and vice versa. Arrows extending downward from the bottom wrap around and lead to rooms in the same column on top of the floor plan and vice versa. If the floorplan were printed out on a piece of paper, you could achieve the same effect by gluing the left and right edges together to form a tube and then gluing the two ends of the tube together to form a torus.
The arrangement of up, down, left and right arrows leading from room to room create the restrictions that manifest themselves as the rules of pattern transformation, the very essence of starmazedness. The arrangement can be clarified by assigning the letters L and R for the left and right pointing arrows (starting with room 0 and proceeding to the right). A similar grid can be constructed for the vertical arrows by assigning U and D for up and down (starting with room 0 and proceeding down). These two grids can then be combined to form a single map of the arrow arrangement for the inner tesseract:
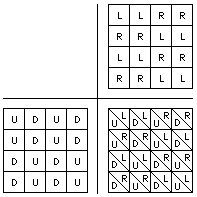
This diagram can be made easier to read by substituting the color black for left and down arrows, and white for right and up arrows. When we do the same for the outer tesseract we notice the arrangements are similar but not quite the same. The outer tesseract has the same arrangement of vertical arrows, but its arrangement of horizontal arrows is reversed (or shifted by two columns). If we were to then shift the vertical arrangement, the resulting combination would create a third possible floorplan; shifting the horizontal arrangement back again would create a fourth. The inner and outer tesseracts use the first two of these four possible floorplans. All this is summarized in the following compact diagram:
Now that we have some insight into how movement is constrained, we can construct a 5D starmap. The first step is to replace the arrows with a system of pipes. With only five dimensions to worry about, we can dispense with many of the complications of the 9D starmap. We simply use the four cardinal directions for the yin and yang dimensions, and a curved pipe extending from one corner for the center dimension.
In our first diagram, moving through the center was done by hopping between the same row and column in the two floorplans. When we introduce curved pipes, movement will instead be directed two rows up or down. This means that to move through the center dimension, you now travel through the curved pipe and then hop to the other floorplan. To make this work, we also need to adjust the second floorplan by shifting it down two rows. In the resulting diagram, you can see that the numbers on the right have been shifted:
This shifting does not alter the structure in any way; it simply changes the alignment between the inner and outer tesseract floorplans. You can test this out by making the center move from our old friend, pattern 11. To do this in the above diagram, simply travel from room 11 (third room in the bottom row of the left floorplan) through the curved pipe up two rows to room 14 and then hop over to room 27 (third room in the second row from the top) in the right floorplan.
This simple change does have one potent effect, though. Before, the rooms in the two floorplans were aligned so that they had the same coordinate patterns except for the center bit. Now they are aligned so that they have inverse puzzle patterns. Room 11, for example, has a puzzle pattern with the center and north yin cells open. As a result of our shift, room 11 is now aligned with room 30 - which has the inverse puzzle pattern: the east, west, and south cells open. This alignment of inverses is why the center pipes are routed the way they are.
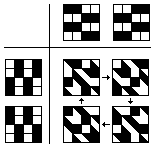
We are now ready to create a single color maze that will combine these two floorplans into one. In a color maze, if you enter a room through a blue pipe, you must leave it through a red pipe, and vice versa. This constrains movement without having to draw arrows. The result is that each room in the combined color maze represents both the pattern in left floorplan and its corresponding value in the right.
We color half the pipes blue and the other half red using our original arrangement of one-way arrows as a guideline. Now, when you enter a room through a red pipe, you will arrive at the pattern listed in the left floorplan above. But if you enter the same room through a blue pipe, you will arrive at the pattern listed in the right floorplan (its inverse puzzle pattern). The two floorplans are now fused into one:
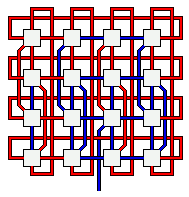
Notice that I have added an extra blue pipe leading to the third room in the second row from the bottom. When entered through a blue pipe, this room corresponds to pattern 26, the starting pattern. If you can find a way to re-enter it through its only red pipe, this same room then corresponds to the ending pattern, pattern 15. Solving the 5D starmaze puzzle, then, is now equivalent to entering this color maze through the blue entrance pipe and finding your way out again.
The solution requires n+2 = 7 steps. In the 5D maze, each of the seven phases of our general solution algorithm is accomplished in a single step:

| Step 1: | Flip center - move up through curved red pipe. |
| Step 2: | Flip west yang - move left through blue pipe. |
| Step 3: | Flip south yin - move down. |
| Step 4: | Flip center - move down through curved pipe. |
| Step 5: | Flip opposite (north) yin - follow pipe down and around. |
| Step 6: | Flip remaining (west) yang - move right. |
| Step 7: | Flip center - return through the curved red pipe. |
The 5D starmaze is a useful size for study. It is large enough to exhibit many of the behaviors of the classic
9D puzzle, but small enough to be much more easily examined and understood. As a result, it affords many insights into the
puzzle, its solution, the starmap, and other aspects of starmaze lore.
![]()
Starmaze Chess
During the time I was studying the 5D maze, it occurred to me that the maze could fit nicely on the squares of an ordinary chessboard. Instead of using curving pipes to represent center-dimensional jumps between the inner and outer tesseracts, you can take advantage of the fact that, when moving diagonally (like bishops), the black and white squares form disjoint sets. Move as he will, a white bishop will never be able to reach the square occupied by a black bishop. And yet, these two sets of squares are adjacent!The first trick, then, is to make all movement on the board diagonal except for movement through the center dimension. To move through the center dimension, the player simply moves one square left or right, thus jumping from the black squares to the white (or vice versa). The second trick to treat the chessboard like a torus (as we did above), so that the top of the board connects to the bottom and the left to the right. This is already a common variation in fairy chess.
There is one final challenge. There are 64 squares on a chessboard but only 32 rooms in the 5D maze. This
problem is overcome by simply placing two full copies of the maze in such a way that, when a piece at the edge of the
first copy moves from square A to square B, instead of wrapping around it proceeds directly to a copy of square B.
Each pattern occurs twice, but the relationships between are unchanged.
And the connection between the two copies is seamless:
![]()
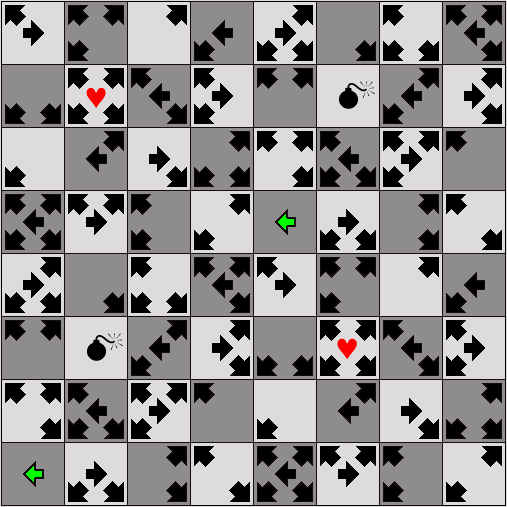
The object of this charming puzzle is to place a king on either of the two green squares and, following the arrows, move until you reach one of the two hearts. Two players could each place a king on the board and take turns, seeing who can find love first. Beware the bomb, though. If you land on that square you will no longer be able to move and the game is over.
The game can be won in no fewer than seven moves. Using a markov analysis, I concluded that a player moving randomly but smart enough to avoid the bombs, would take on average 114.37 moves to find love. So finding love may be harder than it first appears.
There are many four-step cycles in this maze, just as there are in the 9D version, so in theory our poor kings could wander forever. But for a truly random player, one not smart enough to look ahead and avoid bombs, death is inevitable. In any fully-connected network with one or more sinks (rooms with entrances but no exits), it's just a matter of time. And every starmaze has both a source and a sink (room 0).
For these reasons, I was pleased to inscribe the original drawing I did of this chessboard with one of my favorite quotations, from the poet James Dickey:
"Two things are certain: the inevitability of death and the possibility of love."
For more information about the properties of hypercubes in different dimensions, see the Geometry section of Cycles and Seasons.
![]()
![]()
![]()
![]()